
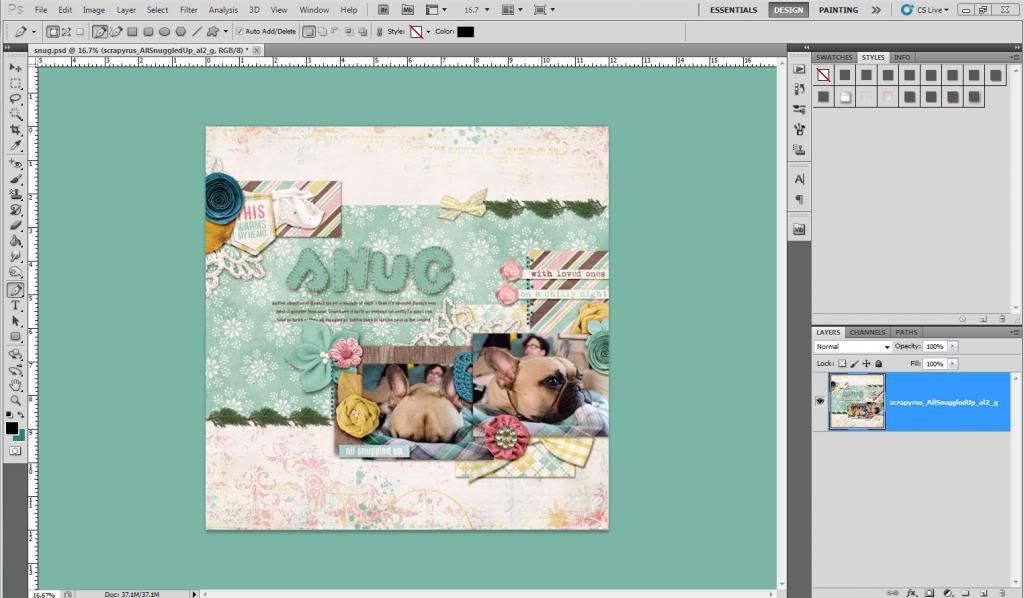
For today I have a little trick that might make your scrapping easier. Have you ever been bored of doing the same thing over and over again and wondered if there could be shortcuts to ease your life? I'm talking specifically about resizing your layout for posting on the web.
After I'm done with my layouts I have to get them ready to post online and they need to be resized to 600x600 pixels (usually) and saved at a resolution of 72 pixels/inch. This can become tedious when it could be done in one single click using an action. Of course you could find one already made and pay the price for it but why would you do that when you can make it yourself?
Here are some easy steps to create your own resizing action with Photoshop:
- Start with your layout (all layers should already be merged
together)
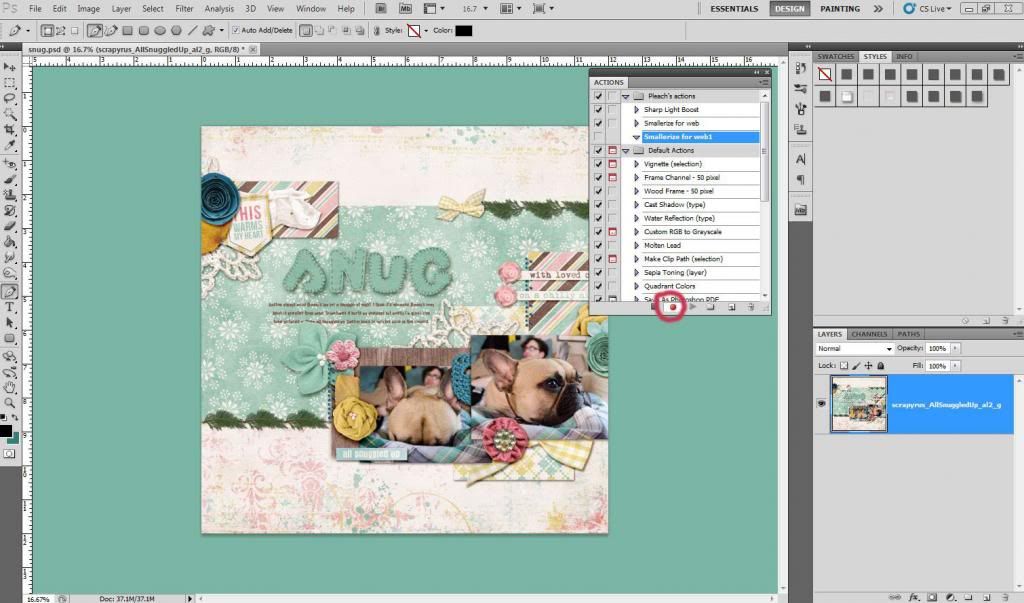
- Open the Action window, usually represented by a black triangle inside of a white rectangle. Or go to Window>Actions or with the keyboard shortcut Alt+F9
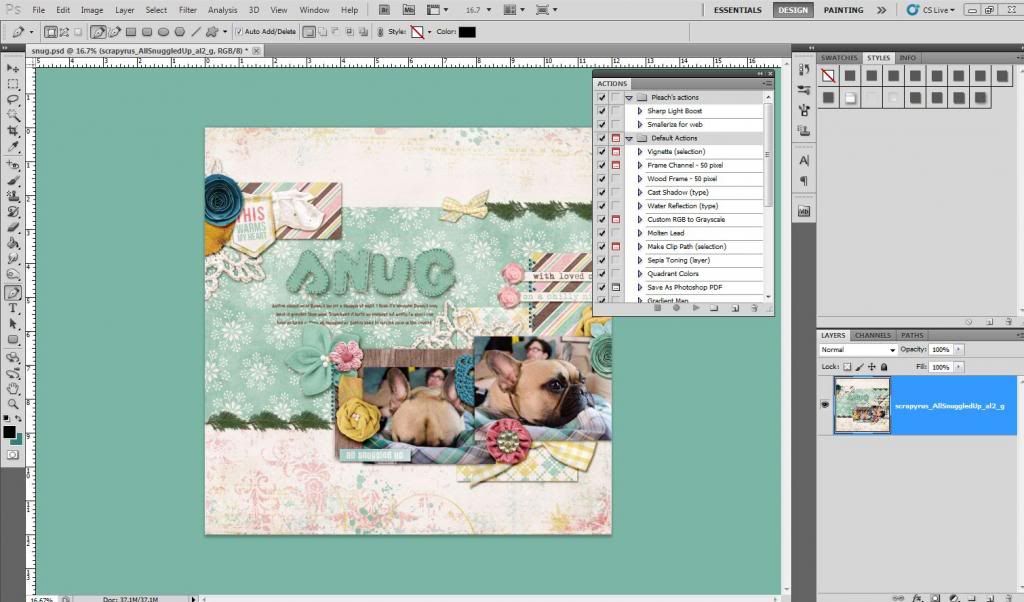
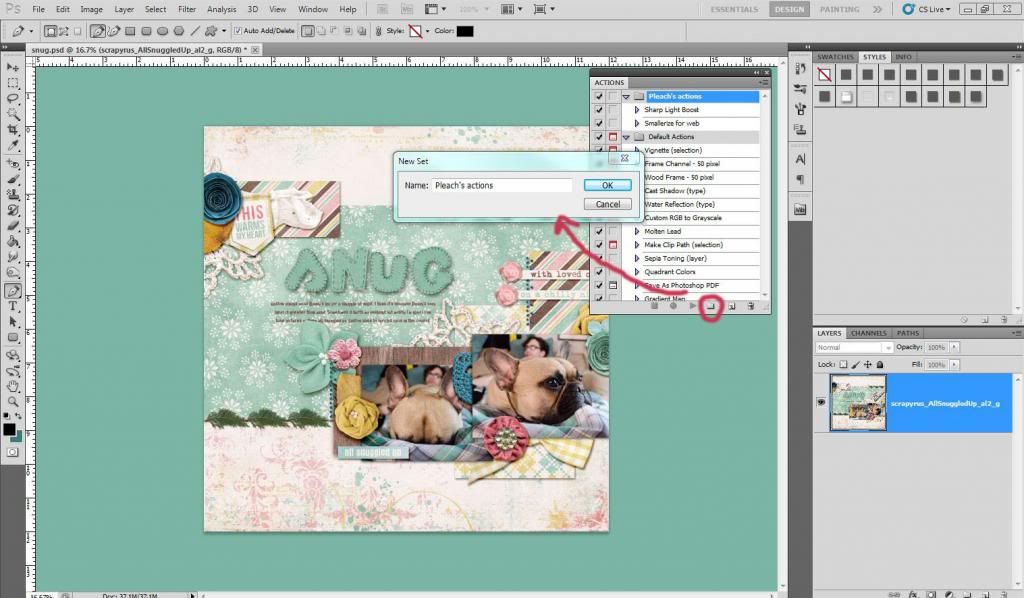
- Create a new set. This will allow you to have a folder with
your own actions to make it easier to find later. Give your set a
name. I named mine Pleach's actions (my husband calls me Pleach)
- Create a new action. Give a name to your action. I named mine Smallerize for web (notice I even created my own word there?). Leave everything else as is. And click Record.
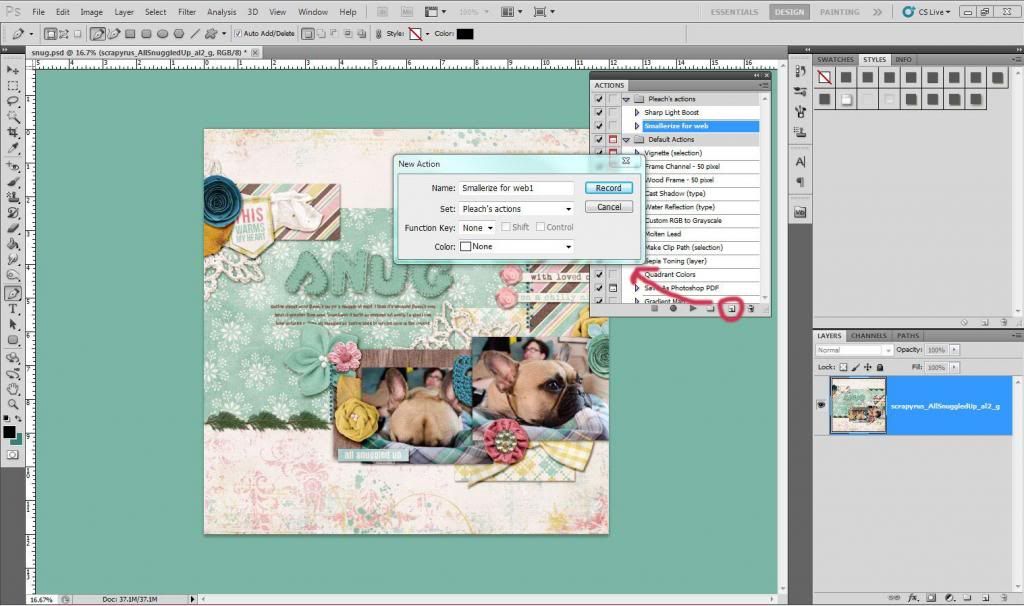
- Notice the circle turned red. It means all your actions will
now be recorded. The first time I did this I felt rushed and got
stressed out because I thought it was timed for some silly reason...
but don't stress. Take your time.
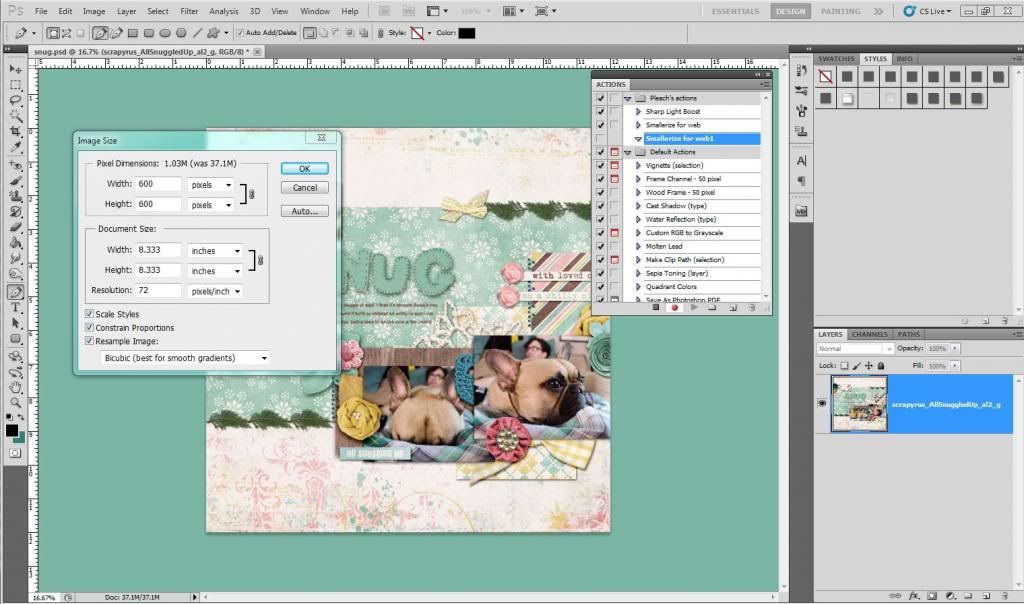
- Now on to recording the settings we want. Go to Image> Image size. First change the resolution from 300 to 72 pixels/inch. Make sure the box “Constrain Proportions” is ticked. Change the dimensions of your layout from 3600 to 600 pixels. It will change both width and height at the same time. Click ok.
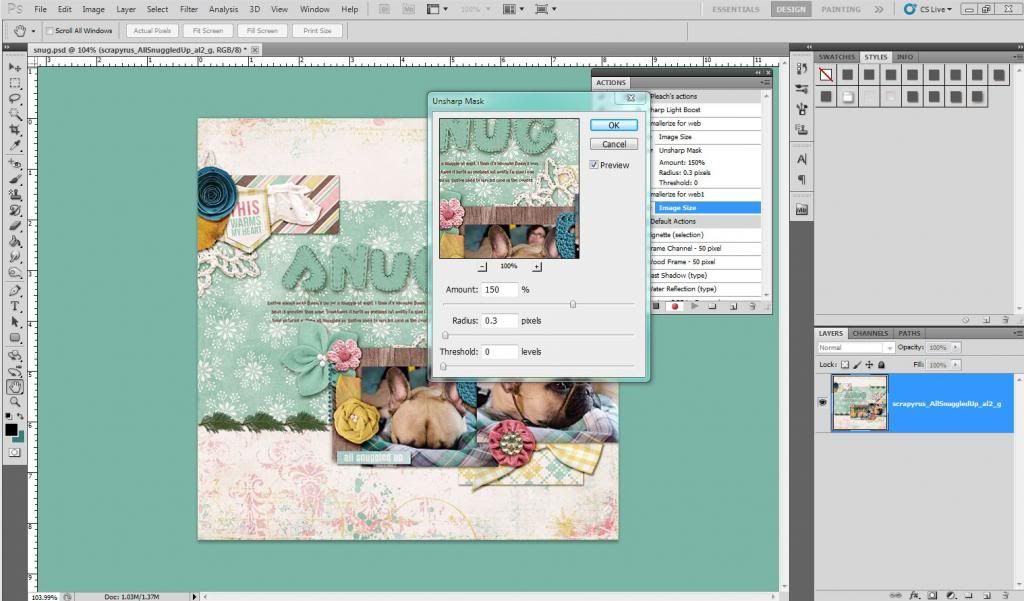
- I like to sharpen my layout at this point. You can choose to
skip this step. Open Filter>Sharpen>Unsharp Mask... Adjust
the settings as is: Amount 150%, Radius 0.3 pixels and Threshold 0
levels. Click ok.
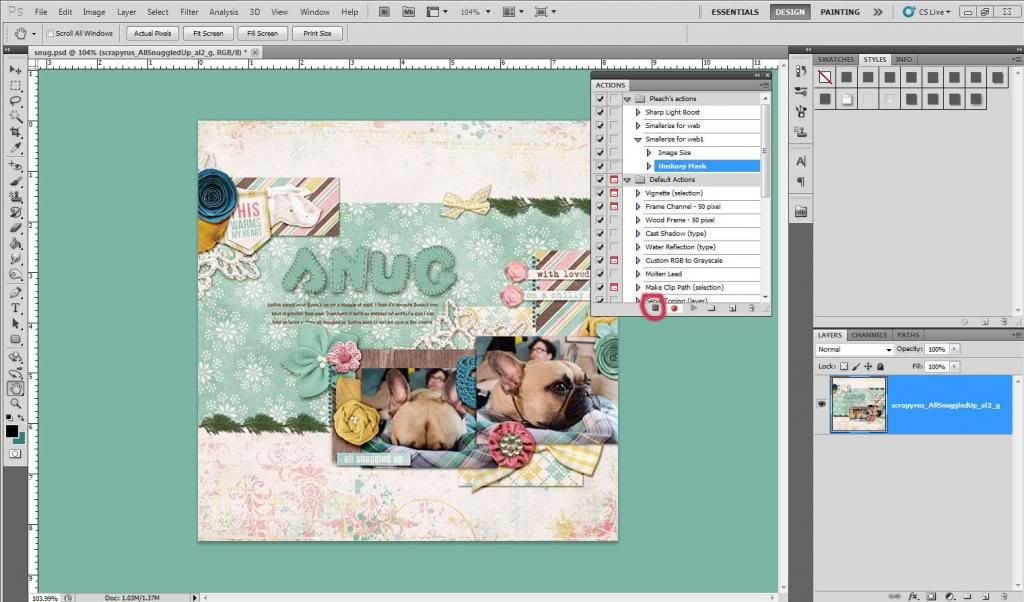
- To finish your action click on the square at the bottom of the actions' window. The red circle should now turn black again.
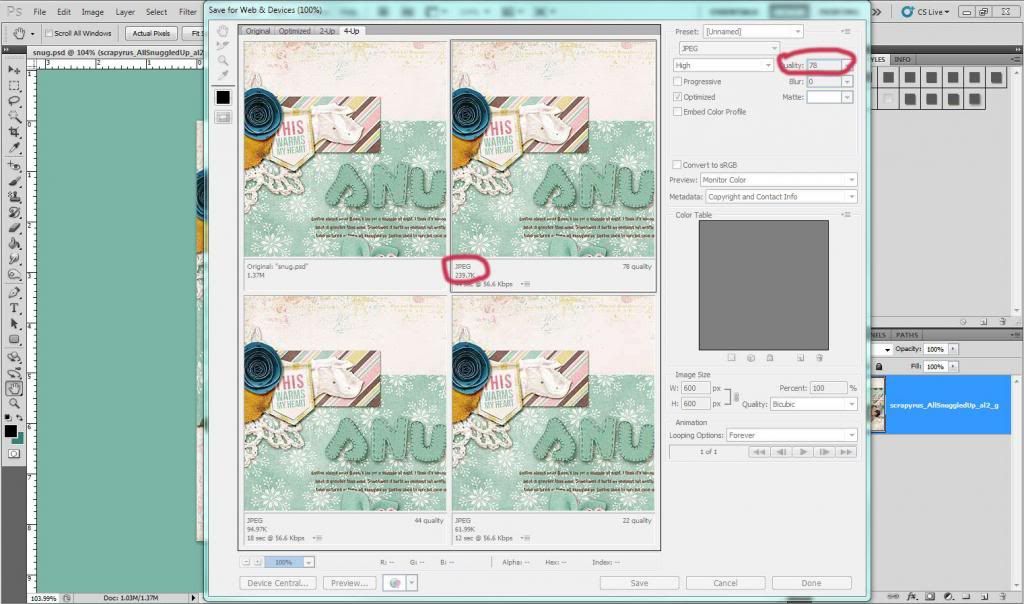
- Now all you need to do is save your layout. Go to File>
Save for web and devices. A window will open with 4 sneak peeks of
your layout. I select the top right corner and play around with the
quality so it's just below 250k (most galleries' maximum layout
size). Click save and choose a name for your file. And you are
done.
Good luck with this tutorial. We hope you enjoy it!
If you have enjoyed this
tutorial, please feel free to share it, but you are not allowed to
copy its content or to claim it as your own. You can download a pdf version of this tutorial here. We hope you enjoy it!
It's even better to share the link to the blog as we will be adding new tutorials regularly on scrapyrusdesigns.blogspot.com
Products used in this tutorial:
|
|
Great tutorial.It's amazing and fantastic tutorial. I like it most.So i am very grateful to you.
ReplyDeleteclipping path service
Really photoshop is the great software for photo editing or photo processing service and action plate is most important and helpful for graphic designer cause it reduce time for image processing. This tutorial very important for graphic designer, thanks sharing this tutorial with us. Also we use all time action plate for image processing.
ReplyDeleteClipping Path Service | Clipping Path Service | Clipping Path Service
Thanks for taking the time to discuss this, I feel strongly about it and love learning more on this topic.
ReplyDeleteAmazing tutorial thanks for sharing with us this action in photoshop.
ReplyDeleteMultiple Clipping Path | Image Masking Service | Drop Shadow Service | Photo Retouching Service | Neck Joint Service
This comment has been removed by the author.
ReplyDeleteReally this tutorial is more details step by step, so that it is easier to learn for any one who want to create something
ReplyDeletenew in any picture by photoshop. Thanks for sharing.
Clipping path service India
Great tutorial
ReplyDeleteNice tutorial
ReplyDeleteThis comment has been removed by the author.
ReplyDeletewonderful tutorial
ReplyDeleteGhost Mannequin Serviceclipping pathclipping path serviceRemove BackgroundPhoto RetouchingImage Masking
your tutorial is so informative and effective for me.So i am very grateful to you.thanks for sharing with us. Clipping Path Service
ReplyDeleteso nice and helpful photoshop tutorial .. thanks go ahead
ReplyDeleteI'm a designer and marketer. The tutorial is great and it increase my photoshop skill. Thanks for sharing a great tutorial.
ReplyDeleteclipping path service
clipping path
color correctoin service
Awesome post, really i appreciate it. Thanks a lot for your nice sharing.
ReplyDeleteClipping Path / Clipping Path service / new movies / civil engineering
Really photoshop is the great software for photo editing. thanks for beautiful tips.
ReplyDeleteClipping Path service | Clipping Path service
I am searching how to create a action for image resizing and finally I have found great one here and easy to learn .thanks so much for your great post .
ReplyDeleteYour tips are really useful. Thank you so much to share. Jewelry Retouching | Jewelry Photo Retouching
ReplyDeleteThis comment has been removed by the author.
ReplyDeleteThat is really nice post. Thanks for sharing this nice post. I hope Multiple Clipping Pathpost will be much more helpful for your visitor.
ReplyDeleteThank you for valuable post. It is very help for for all people. They can also get veluable content of clipping path service .
ReplyDeleteReally photoshop is the great software for photo editing or photo processing service and action plate is most important and helpful for graphic designer cause it reduce time for image processing. Hope that this tips are more helpful for every designer to scrapping their work process.
ReplyDeleteClipping Path Service
I appreciate your work, thanks for all the great blog posts.
ReplyDeleteYou have described all the step nicely...Hope you will do this great job in future..
ReplyDeletebackground remove
I really benefited from your steps that you have explained here perfectly. thanks
ReplyDeleteThis post is absolutely brilliant! Thank you so much for sharing!
ReplyDeleteGreat job man, Wonderful your tutorial. Thanks for sharing with everyone. Learning better for your blog newbie graphic designer. Keep going....photo editing how to
ReplyDeleteGood presentation for easy learning. As a Photoshop learner, I appreciate it.
ReplyDeleteGhost Mannequin Service
Clipping Path Service
Background Removal
It is awesome discussion to understand easily about the importance of clipping path specially on other Photoshop editing service. Very narrative ! Thanks,it is nice and very effective article here.
ReplyDeleteClipping path | Photo editing
Photo Editing | Background remove
Photo Editing | Photoshop editing
Photo Editing | Background removal
Photo retouching | Photoshop editing
Clipping path | Background removal
Really Great tutorial.It's amazing and It is awesome discussion to understand easily about the importance of photoshop. It is the great software for image editing service and action plate is most important and helpful for graphic designer.
ReplyDeleteClipping path Service | Multi path Service | Deep etching
Color Correction Services
Photo Retouching Service | Jewelry Retouch Service
Photo cutout | Background removal
Your post is really amazing and informative.
ReplyDeleteimage masking service
Very helpful tutorial. thanks
ReplyDeleteThis tutorial is really helpful for Photoshop expert designer. Specially the Drop Shadow Service topic clear with me by reading your tutorial thanks.
ReplyDeleteHey !
ReplyDeleteNice post !! here is mine like yours_ https://www.fiverr.com/imageediting247/image-background-removal-superfast
Hey !
ReplyDeleteNice post !! here is mine like yours_
Very Helpful tutorial for beginner with advance level Photoshop expert.
ReplyDeleteThanks for encouraging to Create our own action in Photoshop. Hope your tutorial will help everyone!
ReplyDeleteOffice Space Rent In Gulshan
Very informative, great publish. I wonder why the other specialists of this sector don’t realize this. You must continue your article. I am sure that you have huge readers, base already.
ReplyDeleteInstructive article. This will be helpful for many learners. Thanks for sharing.
ReplyDeleteGraphic Aid's expert professionals will provide the photoshop Neck joint service & ghost mannequin Services at competitive price. Guaranteed service & support.
Great! It's truly great as well as outstanding. I believe it will certainly benefit anyone. Thanks for sharing!
ReplyDeletemasking image
mmorpg oyunlar
ReplyDeleteinstagram takipçi satın al
tiktok jeton hilesi
tiktok jeton hilesi
SAC EKİMİ ANTALYA
referans kimliği nedir
İNSTAGRAM TAKİPÇİ SATIN AL
Metin pvp
INSTAGRAM TAKİPCİ SATİN AL
Very good tutorial. I like it very much. Thanks very much for sharing with us.
ReplyDeleteSMM PANEL
ReplyDeletesmm panel
iş ilanları
İnstagram takipçi satın al
Hirdavatciburada.com
Https://www.beyazesyateknikservisi.com.tr/
servis
tiktok jeton hilesi
çekmeköy daikin klima servisi
ReplyDeleteataşehir daikin klima servisi
maltepe toshiba klima servisi
kadıköy toshiba klima servisi
üsküdar toshiba klima servisi
beykoz beko klima servisi
üsküdar beko klima servisi
pendik lg klima servisi
pendik alarko carrier klima servisi
Very impressive tutorial. Thanks very much for teaching us!
ReplyDeleteEyecatching Photos with Image Editing Service
Thank you, for publishing this post. I hope we will get a more useful post like this in future from you. Image Editing Service that consists of for Image Clipping Path Service, White Background for Image, Shadow | Reflection, Masking, Color Adjustment, Coloring, Mannequin, Retouching, Jewelry Image Editing, Product Image Editing, Image Cropping | Resizing all types image editing service
ReplyDeleteGood text Write good content success. Thank you
ReplyDeletetipobet
kralbet
slot siteleri
bonus veren siteler
betpark
betmatik
mobil ödeme bahis
poker siteleri
This blog post was an excellent read. Thank you for taking the time to share your knowledge and expertise with us.
ReplyDeleteWe provide all kinds of graphic design services at low cost.
Our services are as follows: Clipping path service, Background removal service,
Image masking service, Neck joint service, Ghost mannequin service,
Photo retouching service, Shadow Making Service etc.
yurtdışı kargo
ReplyDeleteresimli magnet
instagram takipçi satın al
yurtdışı kargo
sms onay
dijital kartvizit
dijital kartvizit
https://nobetci-eczane.org/
P862Z
kıbrıs
ReplyDeleteedirne
muş
trabzon
balıkesir
O74U
resimli magnet
ReplyDeleteresimli magnet
çerkezköy çatı ustası
silivri çatı ustası
dijital kartvizit
1MZJ0O
شركة تسليك مجاري بالاحساء NaO01bobks
ReplyDeleteYour ability to connect with readers through your writing is truly remarkable.
ReplyDeleteVisit Here: Background Removal Service
شركة عزل اسطح بالقويعية
ReplyDelete6ojUBhFKOj